Seven seconds. Six parameters. One PupiLUX Pro Report.
A voice-guided protocol runs the full pupillary light reflex in about seven seconds. On-device AI produces a two-page PDF you can file, print, or share.
From launch to report in under 100 seconds
7 seconds for the PLR capture. Under 100 seconds for the full workflow — positioning, capture, AI analysis, and PDF report. Voice-guided throughout — no pupillometry training required.
Open & Point
Launch PupiLUX Pro. Hold iPhone ~12 inches from patient. Voice prompts guide positioning.
Auto-Detect Both Eyes
AI detects face and locks onto both irises simultaneously. No manual alignment needed.
Voice-Guided Flash
Automated 10-second protocol: 2s baseline, 1s torch flash, 7s recovery. Audio prompts throughout — hands-free.
PupiLUX Pro Report
Instant on-device analysis. Timestamped 2-page PupiLUX Pro Report with bilateral pupillograms, 6 parameters per eye, and colour-coded status.
Curious what a PupiLUX Pro Report looks like?
Download Sample Report (PDF, 494 KB)How to read a PupiLUX Pro Report
Every region of the two-page PDF, labelled. Read top-to-bottom — the header anchors identity, the middle is the measurement, the footer is the regulatory record.
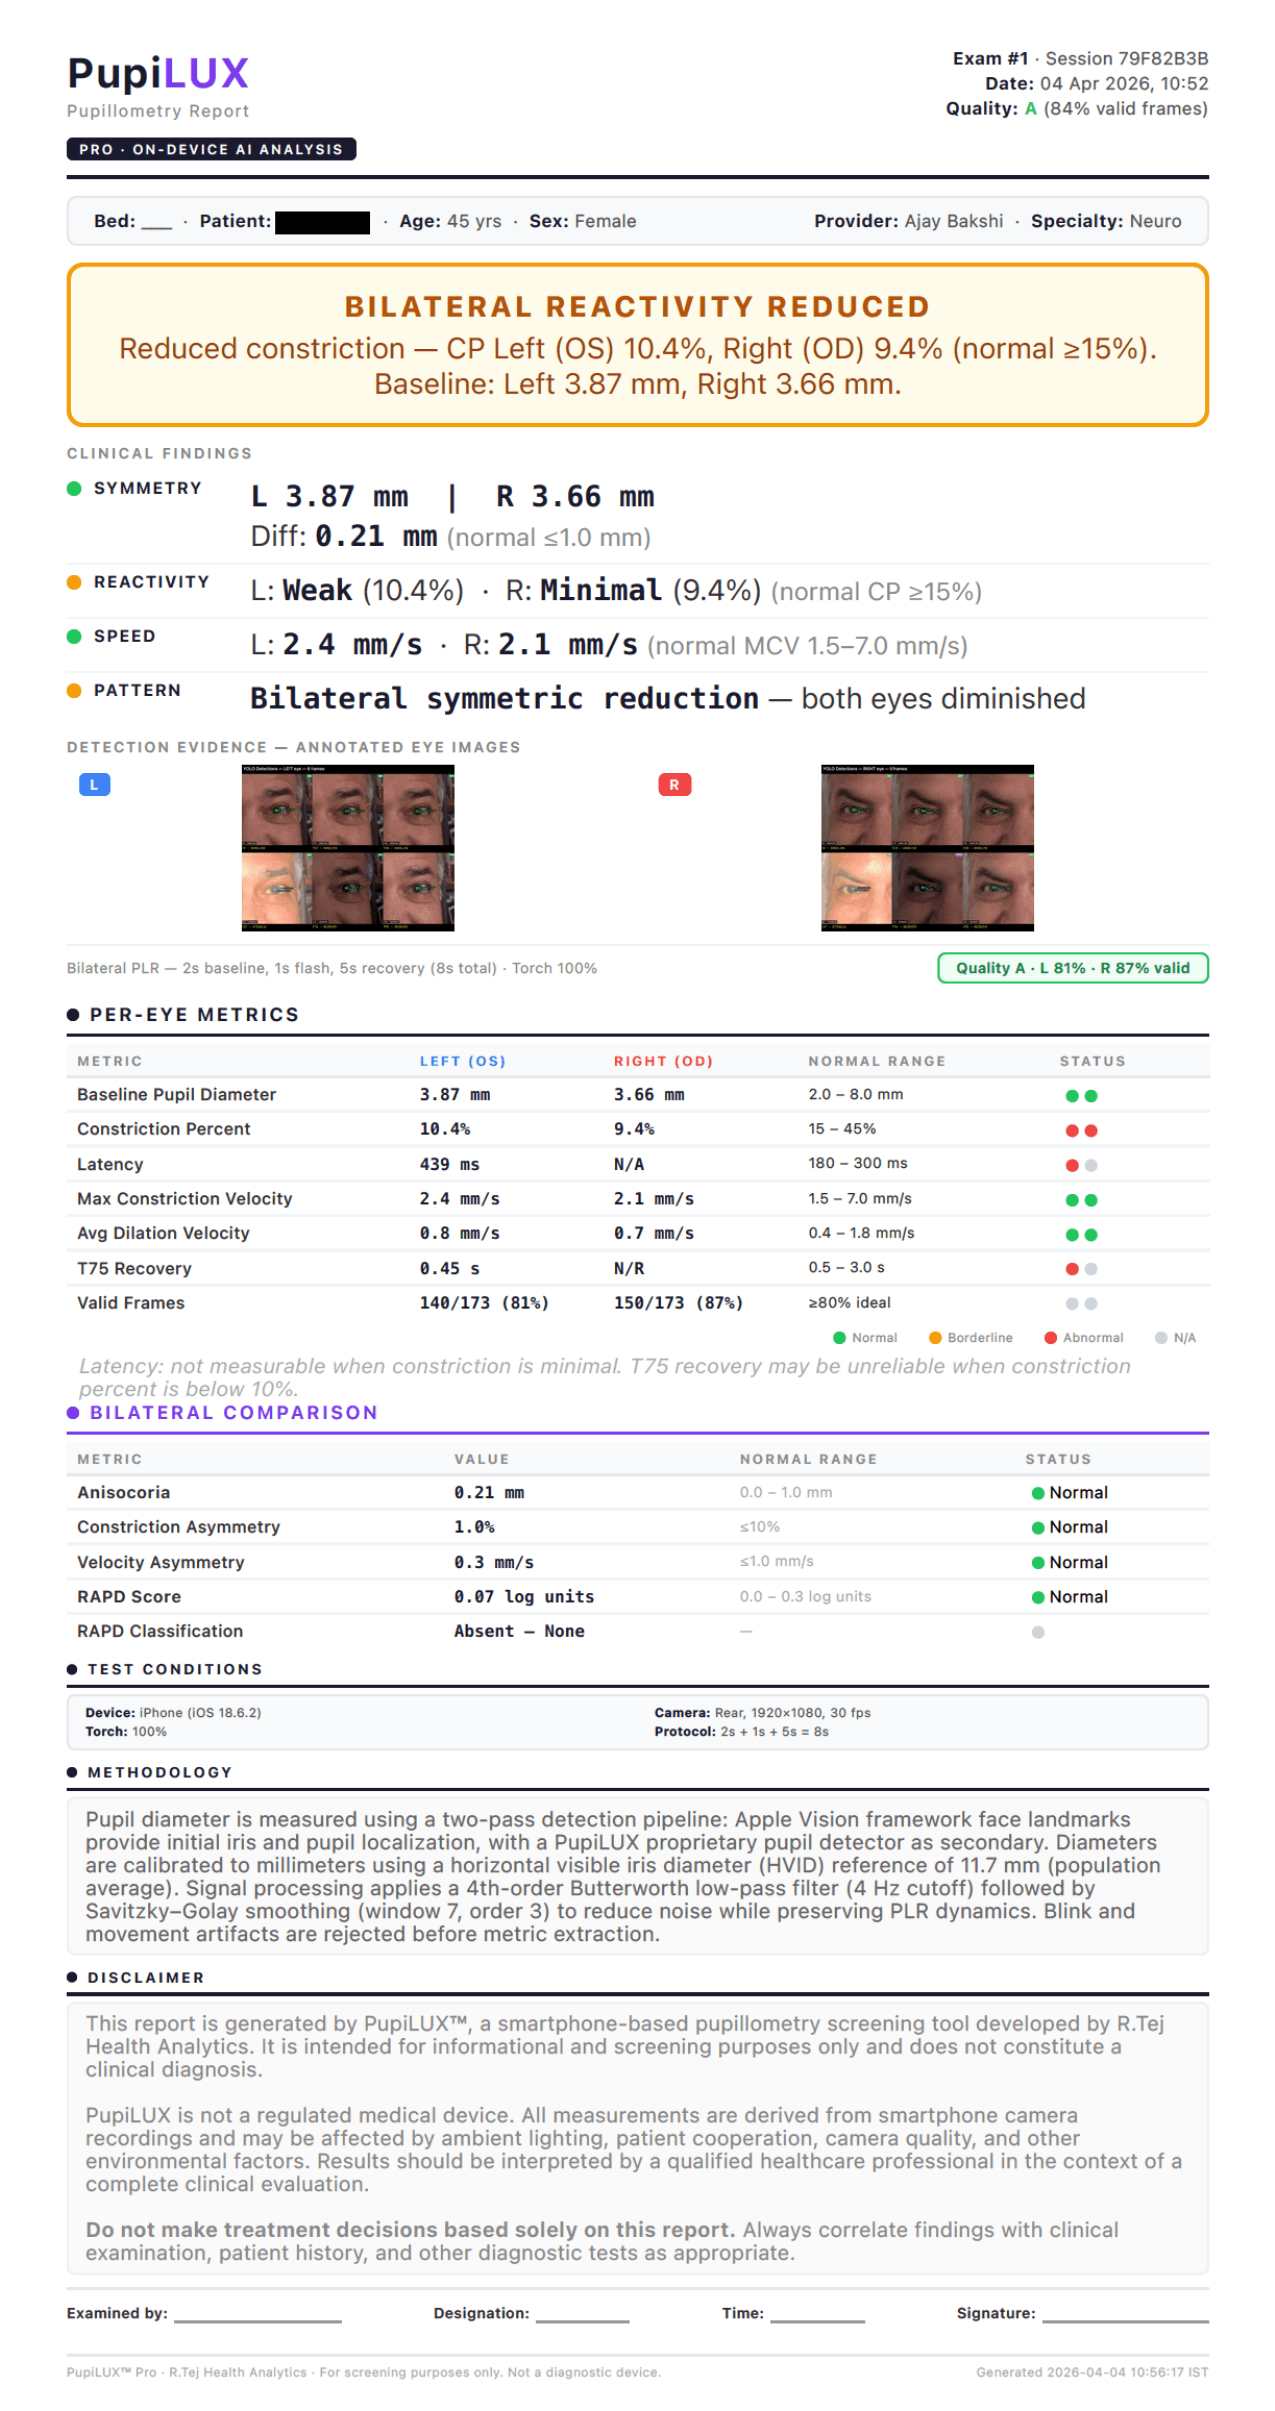
Exam header
Unique exam number, date/time of capture, and quality score (0–4 with percentage of valid frames). Quality 4 indicates ≥85% of frames passed the detection-confidence floor.
Patient & provider row
Optional patient identifier, bed, age, and sex; provider name and specialty. Patient identifier is optional — PupiLUX does not require or store patient names. All fields are captured on-device.
Bilateral reactivity banner
The headline finding, in plain language (e.g. "Bilateral reactivity reduced" or "Within normal limits"), plus baseline pupil diameters for both eyes. This is what the reader sees first.
Clinical summary — four dimensions
Symmetry · Reactivity · Speed · Pattern. Each line gives the per-eye value, the normal range, and a status indicator. The four dimensions cover the clinically-actionable signals.
Detection evidence
Thumbnails of the eye crops used for measurement, with per-frame confidence. This is the cross-validation that the report is measuring the right structures, not an artefact.
Per-eye metrics table
The six quantitative parameters for the left and right eye — BPD, CP, LAT, MCV, ADV, T75 — with normal ranges and colour-coded status dots. The interpretable dataset.
Bilateral comparison
Inter-eye differences — anisocoria (baseline difference), constriction-asymmetry, velocity-asymmetry, and RAPD score. The bilateral signal that single-eye pupillometers cannot produce.
Regulatory disclaimer
"PupiLUX is a measurement tool, not a diagnostic device. For informational and screening purposes only." Present on every report by design. Not removable. Test conditions, methodology, and the signature line follow below this block.
What each measurement tells you
Every value on callout #4 of the report, defined.
Starting pupil diameter in millimetres, measured just before the light stimulus. Sets the reference for every reactivity metric.
How much the pupil constricts in response to the flash, expressed as a percentage of baseline. Scale-invariant.
Time from flash onset to the start of constriction. A slowing pupil shows up here first.
Peak speed of the constriction phase, in mm/sec. Falls off in pharmacologic and neurologic compromise.
Mean speed of redilation once the stimulus ends. Sensitive to autonomic state.
Time from peak constriction until the pupil has recovered 75% of its way back to baseline diameter.
Once the report is generated, how do I share it?
From the report screen, tap Share — iOS opens the standard Share Sheet. Full walk-throughs in the FAQ below.
AirDrop
Tap Share → AirDrop → pick device.
Tap Share → Mail — PDF pre-attached.
Tap Share → WhatsApp → pick contact.
Tap Share → Print (AirPrint).
Engineered for measurement accuracy
Sharing & troubleshooting
How to move the report off the phone, and what to do when something doesn't go right. Clinical-interpretation questions belong on Clinical — see the link below.
How do I send the report to a colleague on WhatsApp?
At the end of the test, tap Share → WhatsApp. Pick the contact or group, add an optional note, and send. The report travels as a PDF attachment. If WhatsApp is not installed, iOS will show the full Share Sheet so you can use iMessage, Telegram, Signal, or any other installed app.
Can I email the report directly from the app?
Yes. Tap Share → Mail. iOS opens a new message with the PDF already attached. Add the recipient(s) and subject, then send. If you use Gmail or Outlook, pick them from the Share Sheet instead.
How do I print the report to a hospital printer?
If the printer is on the same Wi-Fi and supports AirPrint, tap Share → Print, choose the printer, and confirm. For non-AirPrint printers, AirDrop the PDF to a nurse-station Mac or Windows machine and print from there.
Can I AirDrop the report to another iPhone or Mac?
Yes. Tap Share → AirDrop. Nearby devices with AirDrop enabled appear as icons — tap the target and the PDF transfers. AirDrop works without Wi-Fi or a data connection.
The report didn't generate. What do I do?
Most likely one or both eyes were not detected during the capture (face out of frame, bright reflection, eyelid occlusion, or very small pupils). Re-run the test in a dimmer room, at ~12 inches, with the patient's eyes open and clear of the torch beam. If the issue repeats, email info@pupilux.ai with the patient-facing timestamp and your iPhone model.
My credit was deducted but the test failed. How do I get it back?
PupiLUX only deducts a credit after a successful report is generated. If a credit appears to have been consumed without a report, open Settings → Credits and tap Contact Support — the system attaches diagnostic metadata automatically. Credits are refunded once we confirm the failure.
The app crashed during the test. What now?
Close the app fully (swipe up from the bottom and swipe PupiLUX off the stack), reopen it, and run the test again. If crashes repeat, check that iOS and PupiLUX are on the latest versions. If both are current and crashes continue, email info@pupilux.ai with your iPhone model, iOS version, and the approximate time of the crash.
PupiLUX says "Storage full" — what do I clear?
PupiLUX keeps raw frames from recent tests on-device for quality review. Open Settings → Storage and tap Prune Old Recordings — this removes the raw binary data from tests beyond the 200-test local cap while preserving the PDF reports and measurement metadata.
I updated iOS and now the camera won't open.
After an iOS update, iOS sometimes resets app camera permissions. Go to Settings → PupiLUX → Camera and confirm it is enabled. Restart the app. If the camera still fails, restart the iPhone once.
How do I send feedback or report a bug?
Email info@pupilux.ai with a description of what happened, your iPhone model, iOS version, and the approximate timestamp of the test. If the report was generated, attach the PDF. We read every message.
Looking for clinical or interpretation questions? Start on the Clinical page →
Send feedback
Bug reports, feature requests, clinical-workflow feedback — email us directly. We read every message.
info@pupilux.aiNot downloaded yet? See why clinicians use PupiLUX →
Start using PupiLUX today
Bilateral pupillometry for the ICU and ER. Voice-guided, on-device AI, PupiLUX Pro Reports. 20 free tests to start — 14-day trial.
Requires iPhone with rear camera & torch. iOS 17.0 or later.